Changing Hostname on Linux Server
In your Linux server, you can change the hostname of your server by following this simple steps. I’m using a Centos 6.9 as my server to this tutorial but I’m sure it applies to other Linux distros as well. First of all, edit the network file on the Linux server to change the hostname by typing this command:
vi /etc/sysconfig/network
Then, find the HOSTNAME variable and change it the name as you desired.

Next, apply the hostname change by typing:
hostname [name]
Replace the [name] with the host name that you want. Next, restart the network service to make the changes permanent.
service network restart
Enabling SSH Access to Remote Linux Server
In this tutorial, I’m using Centos 6.9 but I’m sure this configuration applies to every Unix base Linux Server. To enable ssh access from your local computer to a remote Linux Server, first you have to edit the sshd_config file on the remote server. You can find this file in the directory /etc/ssh/sshd_config. Edit the ssh configuration file by typing the command:
vi /etc/ssh/sshd_config
Inside the file find the string #PermitRootLogin yes, and uncomment that line like so:

Save your edited configuration and restart the sshd service by typing the command:
service sshd restart
By typing that command, you will get an output something like this:

Now, do an ifconfig command on the remote server to find out what’s the IP of the remote server: We find out that our remote server is at 192.168.11.140. So, startup an ssh client application such as putty to connect to the remote server.

How to Install Missing Perl Modules in Linux
When encountering a missing Perl module during an application installation execution such as like this:

You can install the missing Perl module (in this case, IO::Uncompress::Unzip), by typing a yum command like this:
yum install ‘perl(IO::Uncompress::Unzip)’
Press enter and the yum application will automatically search the missing module you input and install it to your Linux system.
How to Install Instant Client for Oracle Database
Instant Client is an Oracle database auxiliary application that contains libraries such as OCI or JDBC to connect to a remote database server. To install Instant Client, it is available in the following link: http://www.oracle.com/technetwork/topics/linuxx86-64soft-092277.html

Select the Instant Client product that has the same as your Oracle database version. In this tutorial, we are using Oracle database 11g so we will use instant client 11.2.0.4. After you have downloaded the instant client, unpack the zip file and put it under the directory /opt/oracle/instantclient/. After that, make a symbolic link to the libclntsh.so.11.1 file by typing:
ln -s libclntsh.so.11.1 libclntsh.so
Also, set file permission to libclintsh.so and libnnz11.so by typing:
chmod 755 libclntsh.so
chmod 755 libnnz11.so
Change to the oracle user that you use to install your Oracle by typing su – oracle. Next, set your system environment accordingly for the instant client directory:
export D_LIBRARY_PATH=/opt/oracle/instantclient/
export ORACLE_HOME=$ORACLE_HOME:/opt/oracle/instantclient/
export PATH=$PATH:/opt/oracle/instantclient/
Adventure Time: Melaka, Malaysia
During the weekend, My colleagues and I decided to go on a road trip to Melaka. We took a car there and it took approximately 2-3 hours to arrive there. For those who don’t know, Melaka city is located on the southern east part of Malaysia. It’s a port city where I believe the dutch once colonized during the time. Jonker street is a place to be, street food vendors are lining up here in the evening until night so if you want to look for a great food, you might want to stroll around this area. Just passing the Jonker street, you will find a tourist spot. This part is what you called Kota Tua (Old City) and the buildings here resembles European style because of the dutch previous occupation on this city. It makes up for a great experience taking a vacation here.


Adventure Time: Batu Caves, Malaysia
On June 30th 2017, I moved to Kuala Lumpur, Malaysia. I got an interesting job offer there and after I discussed it with my wife and family, they were supportive on accepting the job. So, here I am now, residing in Kuala Lumpur, Malaysia. I met with some of my college friends here who happens to be working in Kuala Lumpur so we decided to take a sightseeing tour to Batu Caves. For you who haven’t gone there, Batu Caves is reachable via the KTM train, from the KL Sentral station. It will take you around 20-30 minutes to reach there and cost around 2.50 Rm by train. Batu Caves, just like the name, is a cave which inside Hindus people of Malaysia built a temple around it. There is a big gold deity statue before the entrance of the cave which I believe is a statue of Murugan. To get to the cave, you need to climb up the stairs so prepare for an exercise, but when you get there, the view below is quite spectacular. Too bad that when I visit this site, there’s seems to be a construction going on, but it’s not that bothering to me. You can also take a cave tour here if you like.


Troubleshooting Oracle: Unable to Mount Database Due to Invalid PFILE
Recently in Oracle, I encountered an issue regarding the configuration of Oracle Database. Whenever I try to execute a startup command on the database console, the Oracle database gives me the init<SID>.ora can’t be found. So, the very first I do is to check for that particular ORA file, whether it existed or not. You can find your ORA file resides in the <ORACLE_HOME>/dbs folder. Upon inspection of the folder, there is no init<SID>.ora file which is a little bit weird.
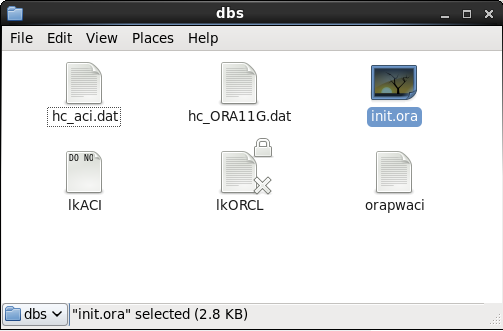
So, I decided to clone the existing init.ora file and give the file name init<SID>.ora (Note: The <SID> refers to the SID name you given during the Oracle database installation. If you are not sure what SID you have set on the installation, you can check the tnsname.ora under the directory <ORACLE_HOME>/network/admin and check the SERVICE_NAME variable). Now, check the content of your ORA file that you have cloned:

Few things that need to be verified in this file:
- The variable db_name has to refer to the Global database name that we have set during the Oracle database installation. I encountered that the db_name is ORCL while during the installation I set it to ACI. So I have to adjust my db_name value to ACI.
- Make sure your audit_file_dest refers to a valid location. Initially in this file, the variable goes to /ora01/app/oracle/admin/orcl/adump while the valid location is /ora01/app/oracle/admin/aci/adump. Thus, I changed the value into a valid location.
- Make sure the db_recovery_file_dest is pointing to a valid location. This is no issue for me since it already is pointing to a valid directory.
- Make sure the control_files variable is pointing to a present control file. The control file is identified by a .ctl extension. In my case, it resides in the directory /ora01/app/oracle/oradata/aci/control01.ctl.
If you are sure with your configuration, don’t forget to save the file. On the command line, login to the Oracle database as sysdba by typing:
sqlplus / as sysdba
Once you are in the Sqlplus console, type as follow to start your database:
STARTUP PFILE=’/ora01/app/oracle/product/11.2.0/db_1/dbs/init<SID>.ora’
If your ORA file configuration is correct, then the Oracle database should successfully mounted the database.

How to Install Oracle Database in Linux Centos
This installation tutorial is made using Oracle database 11g on a Linux Centos 6 – 64 bit machine. For installation of Oracle database on a Linux Centos 7, I recommend using Oracle 12g because in my experience installing Oracle database 11g on Centos 7, there is a graphical issue where the popup dialog on the installation interface will not be shown.
This tutorial assumes the user has already have a Linux Centos installed on their local machine and also has a basic knowledge of Linux command line application. First of all, obtain a copy of Oracle database on this link: http://www.oracle.com/technetwork/database/enterprise-edition/downloads/index.html
 Since this tutorial is using a Linux Centos 6 – 64 bit machine, we will be using Oracle 11.2.0.1.0 for Linux x86-64. Download all the files that are provided on the link (File 1 and File 2), and after you have finished the download, you will have these files:

Installation Prerequisites
Before we begin to install Oracle 11g to our Linux Centos machine, we have to do some prerequisites task. Open up a terminal application on the Linux Centos machine, and change to root user by typing the command:
su – root
Next, we need to setup a user and usergroup that will have the authority to execute and manage the Oracle database. You can actually use root user to do this but as a best practice, always use different user for different functionality. Therefore, we want to create a user named oracle which will have the privilege to execute and manage oracle database function. On the terminal as root user, do the following command:
/usr/sbin/groupadd -g 501 oinstall
/usr/sbin/groupadd -g 502 dba
/usr/sbin/groupadd -g 503 oper
/usr/sbin/useradd -u 502 -g oinstall -G dba,oper oracle
After we have successfully created the user oracle for our Oracle database system, set the password for user oracle by typing:
passwd oracle
After we have successfully create an oracle user for our oracle database installation, we need to tune the Linux kernel’s parameter. Edit the sysctl.conf file by typing vi /etc/sysctl.conf (or you can use any text editor application to your preference) and insert the following line into the file:
kernel.shmmni = 4096
kernel.shmmax = 4398046511104
kernel.shmall = 1073741824
kernel.sem = 250 32000 100 128fs.aio-max-nr = 1048576
fs.file-max = 6815744
net.ipv4.ip_local_port_range = 9000 65500
net.core.rmem_default = 262144
net.core.rmem_max = 4194304
net.core.wmem_default = 262144
net.core.wmem_max = 1048586
Note: Inside the existing sysctl.conf, there are already kernel.shmmax and kernel.shmall variables defined. So, make sure to comment those out so there wouldn’t be any variables duplication. After you have save the changes you made on sysctl.conf, apply the kernel parameter by executing /sbin/sysctl -p.
Next part is to set shell limits to the oracle user. The shell limits configuration is stored in the /etc/security/limits.conf directory, so open the file on a text editor application and insert the following line:
oracle soft nproc 131072
oracle hard nproc 131072
oracle soft nofile 131072
oracle hard nofile 131072
oracle soft core unlimited
oracle hard core unlimited
oracle soft memlock 50000000
oracle hard memlock 50000000
Now, we need to set-up a valid hostname for the Linux machine. You can change the hostname configuration inside the /etc/hosts file. Insert a valid IP of your local machine and the hostname it will have. In this installation, we don’t change the configuration and decided the hostname will be localhost.

As a side note, you can verify whether your hostname configuration is correct by doing a ping command in the Linux command line application. The next step now is to modify the .bash_profile file for user Oracle. The .bash_profile file is an automated file script that is executed whenever we login as a user, so the objective of modifying the .bash_profile file for user Oracle is to set up the necessary environment setting for oracle database to operate. Go to oracle user home directory (/home/oracle) and modify the .bash_profile file by inserting:
# Oracle Settings
export TMP=/tmpexport ORACLE_HOSTNAME=localhost
export ORACLE_UNQNAME=aci
export ORACLE_BASE=/ora01/app/oracle
export ORACLE_HOME=$ORACLE_BASE/product/11.2.0/db_1
export ORACLE_SID=aciPATH=/usr/sbin:$PATH:$ORACLE_HOME/bin
export LD_LIBRARY_PATH=$ORACLE_HOME/lib:/lib:/usr/lib;
export CLASSPATH=$ORACLE_HOME/jlib:$ORACLE_HOME/rdbms/jlib;alias cdob=’cd $ORACLE_BASE’
alias cdoh=’cd $ORACLE_HOME’
alias tns=’cd $ORACLE_HOME/network/admin’
alias envo=’env | grep ORACLE’umask 022
Take note on the value of ORACLE_HOSTNAME, ORACLE_UNQNAME, ORACLE_BASE, ORACLE_HOME, and ORACLE_SID on this .bash_profile file we modify.
- ORACLE_HOSTNAME: Refers to the hostname of the machine that the oracle database is installed. If you are not sure what hostname your machine is set, you can type hostname on the command line.
- ORACLE_UNQNAME: Refers to the unique id that will identify your oracle database installation.
- ORACLE_BASE: The installation directory of the oracle that we will install later on.
- ORACLE_HOME: The installation directory which we will extract the oracle installation to.
- ORACLE_SID: The service name of the Oracle database to connect to later on.
Oracle database needs some packages to function, so do a package check on the command line by typing:
rpm -q –qf ‘%{NAME}-%{VERSION}-%{RELEASE}(%{ARCH})\n’ binutils \
elfutils-libelf \
elfutils-libelf-devel \
gcc \
gcc-c++ \
glibc \
glibc-common \
glibc-devel \
glibc-headers \
ksh \
libaio \
libaio-devel \
libgcc \
libstdc++ \
libstdc++-devel \
make \
sysstat \
unixODBC \
unixODBC-devel
In this tutorial case, the command line responded with:

Therefore, try to install the missing packages that the Oracle database needs. You can install packages in Linux by typing yum install <package name>. In this particular tutorial case, we install the missing packages as follows:
yum install elfutils-libelf-devel gcc gcc-c++ ksh libaio-devel libstdc++-devel unixODBC unixODBC-devel
The next step now is to make the corresponding directory based on the ORACLE_HOME and ORACLE_BASE value that we have set in the .bash_profile for oracle user. In this tutorial case, the directory that we need to create is /ora01/app/oracle/product/11.2.0/db_1. You can create directory using the command line by inputting:
mkdir -p /ora01/app/oracle/product/11.2.0/db_1
Don forget to set write and read access to all user in this folder so we can extract the oracle installation file in this directory:
chmod 777 -R /ora01
After that, unzip the oracle database installation file by typing:
unzip linux.x64_11gR2_database_1of2.zip
unzip linux.x64_11gR2_database_2of2.zip
Move the extracted files (don’t copy the database folder but go into the database folder then copy all the files inside it) to the ORACLE_HOME directory (/ora01/app/oracle/product/11.2.0/db_1). So, in the end, you will have this kind of arrangement in your ORACLE_HOME folder:

Now, set the owner and permission for this folder so only oracle and dba group can manage the folder (Not a must but consider a good practice):
chown oracle:oinstall /ora01/app
chmod 775 /ora01/app
chown oracle:oinstall /ora01/app/oracle
chmod 775 /ora01/app/oracle
chown oracle:oinstall -R /ora01/app/oracle
The next step is to disable secure Linux. The configuration can be found in etc/selinux/config. Edit the file using a text editor and edit the following variable inside the file:
SELINUX=permissive
Now that we have finished our prerequisites setup, we are ready to install Oracle database to our Linux machine.
Installing Oracle Database
First of all, you have to change to user oracle to start the Oracle database installation:
su – oracle
After that, type cdoh on the command line, this should automatically change to the ORACLE_HOME directory. To start the installation, type ./runInstaller in the command line and it will show the Oracle database graphical installation interface.
Troubleshooting: There are some cases where we type ./runInstaller, the checks will fail to check the graphic module by stating the system can’t open display. If this issue occurs, please refer to this link to apply for the fix: https://knowledgejunk.net/2017/07/27/how-to-solve-cant-open-display-error-on-installing-oracle-on-linux/
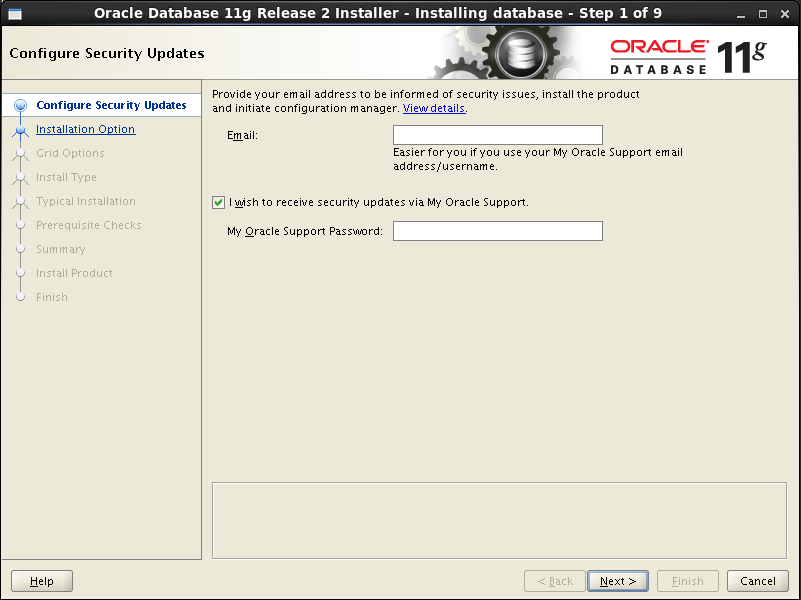
Now, uncheck the checkbox and click next to proceed. Select the Create and configure a database option and click next.

Now, in the System Class part, choose Server Class and click next.

Choose Single instance database installation option and click next.

In the Install Type section, choose Typical Install and click next.

Set your database name and your administrative password and press next.

Don’t change anything in the Create Inventory section and click next.

Check the Ignore All check box if there is a failed check item and press next.

Click Finish.

Wait until the Oracle database installation is finished.
 After the installation has reached 100%, you will be prompted to execute two scripts that are displayed on the Oracle database installation. Therefore in the command line as a root user, execute both scripts provided.

Comments